
How to Use iPhone Camera:
Plain Guide to Camera Controls
Learning how to use iPhone camera controls starts with a few small habits. You don’t need every setting. You just need to know what each control is for and when it helps.
The camera app can handle a lot on its own, but you still have control over focus, brightness, lenses, modes, and low-light shots. Once you know where those tools are, the app feels much easier to use.
Key Takeaways
Use Photo mode for everyday shots before trying extra camera modes.
Tap your subject first, then adjust brightness before pressing the shutter.
Choose lens buttons carefully, since zoom options depend on your model.
Night mode helps still scenes, but moving subjects can still blur.
Check the camera settings once so that useful tools are easier to access.
BOB WILD FINE ART
FEATURED GALLEY

What should you do before taking the photo?
Start by choosing the right mode, checking the light, and tapping the main subject on the screen.
This gives the camera app a clearer idea of what you want. It can already focus and set brightness on its own, but your tap tells it which face, object, or detail matters most.
Open Camera from the Lock Screen, Home Screen, Control Centre, or Camera Control on supported iPhones. Once you’re in the app, look for the large shutter button, the row of modes, the front and rear camera switch, and the lens or zoom buttons.
For a normal picture, stay in photo mode. Point the camera, tap the subject, adjust brightness if needed, and then take the shot. If you’re taking a selfie, use the camera switch icon. If you want a quick clip instead, move to Video or use the quick video option if your iPhone supports it.
Some controls may be hidden behind an arrow or a swipe-up panel. That’s where you may find options like flash, Live Photos, timer, aspect ratio, exposure, and filters or styles. The exact layout can vary by iPhone model and iOS version.
How do you control focus and brightness?
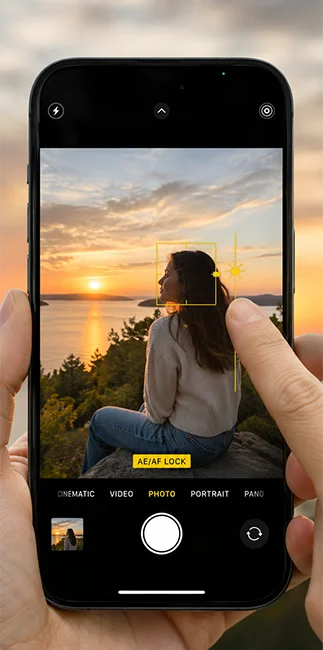
Tap the subject to focus, then drag the exposure control up or down to change brightness.
This is the most useful habit to build when using the iPhone Camera app. It helps when the camera picks the wrong subject, when a face is too dark, or when a bright sky makes the whole photo look off.
After you tap, a focus box appears. A small sun icon may appear beside it. Drag up to brighten the photo. Drag down to darken it. Use the screen preview as your guide instead of guessing.
Use AE/AF Lock when the camera keeps changing its mind. Touch and hold the focus area until AE/AF Lock appears. This locks focus and exposure, which helps when filming, shooting through glass, photographing a backlit person, or framing a scene where light keeps changing.
To remove the lock, tap somewhere else on the screen. Don’t leave it on by accident, since the next photo may need a different focus point.
Which mode should you pick for the scene?
Pick the mode based on what is happening in front of you, not based on which feature sounds more advanced.
This helps you avoid using extra tools when photo mode would do the job. It also helps you choose the right option when the scene is wide, dark, moving, or better suited to video.
|
Camera Mode |
Best For |
Beginner Tips |
|---|---|---|
|
Photo |
Everyday pictures |
Tap to focus before shooting |
|
Portrait |
People, pets, objects |
Check the blur before saving |
|
Pano |
Landscapes, buildings, wide rooms |
Move slowly and steadily |
|
Video |
Normal clips |
Lock focus if brightness shifts |
|
Slo-Mo |
Sports, pets, movement |
Use it in good light |
|
Time-Lapse |
Sunsets, clouds, setup videos |
Keep the phone stable |
|
Cinematic |
Focus shifts and background blur |
Use with a clear subject |
Photo
Use Photo when nothing special is needed. It’s the safest choice for quick shots, signs, food, travel, and family moments.
Portrait
Portrait works best when there is some space between the subject and background. Check the subject edges before taking the photo.
Pano
Pano needs slow movement and a steady hand. Avoid using it when people or cars are moving through the frame.
Video
Video can shift focus or brightness as you move. Use AE/AF Lock when you want the look to remain steady.
Slo-Mo
Slo-Mo needs plenty of light. Save it for action that is easy to see clearly.
Time-Lapse
Time-lapse works best when the phone does not move. Prop it up or use a tripod if you have one.
Cinematic
Cinematic mode is model-dependent. Use it for simple scenes with one clear subject, not busy action.
How to Use iPhone Camera Controls Without Overthinking It
Use the control that addresses the issue at hand.
If the subject is soft, tap to focus. If the photo is too dark, raise the exposure. If the background is distracting, try Portrait mode. Try 0.5x or Pano if the scene is too wide. If the light is low, hold the phone steady and let Night mode work if your iPhone supports it.
The goal is not to use every feature. It’s to make one clear choice before you press the shutter.
Use lens buttons before pinching to zoom.
The lens buttons are usually a better starting point than pinching far into digital zoom.
You may see options like 0.5x, 1x, 2x, 3x, or 5x. These depend on your iPhone model. A 0.5x view is useful for wide spaces, buildings, landscapes, and large groups. A 1x view works for most everyday photos. Telephoto options, when available, help with portraits, details, and subjects you can’t stand close to.
Try not to overuse digital zoom. It can make the image look softer, especially in poor light. Move closer when you can. If you can’t move closer, take the photo with a cleaner lens option and crop later if the quality still looks good.
Also check the edges of the frame before you shoot. Wide lenses can stretch faces near the edge, and telephoto lenses can make it harder to keep the phone steady.
Use Live Photos when timing is hard.
Live Photos capture a brief moment before and after the still image.
They help when someone blinks, a pet moves, or a child changes expression quickly. You can often choose a better frame later, which makes Live Photos useful for unpredictable moments.
Turn Live Photos off when you want a simple still image, when storage matters, or when you don’t need sound and motion attached to the photo. The Live Photos icon is usually available in the Camera app, though its location can vary.
If Live Photos keeps turning back on or off, check Preserve Settings in the Camera settings. That option can help your iPhone remember the choice you prefer.
Check these camera settings once.
A few settings can make the Camera app easier to use every day.
Turn on the grid if you want help with straight horizons and cleaner framing. It gives you a simple guide without changing the photo itself.
Check Preserve Settings if you want the camera to remember your last mode, Live Photos choice, exposure adjustment, or other recent choices. This is helpful when you often shoot the same way.
Keep QR code scanning on if you use the camera for menus, signs, tickets, forms, or quick links. It saves you from opening another app.
Review formats and resolution controls if your phone offers them. Some models include higher-resolution photo options, different video settings, or pro formats. Higher quality can mean larger files, so use those settings when you need the extra detail.
Photographic Styles may also appear on some iPhones. These change the look of the photo before you take it, such as tone, colour, and intensity. Use them carefully, and remember they are not available on every model.
Work with low light instead of fighting it.
Night mode can help in dark scenes, but it works best when the phone and subject stay still.
On supported iPhones, Night mode appears automatically when the camera detects low light. It uses a longer capture time to collect more light. That’s why you need to hold the phone steady until the shot finishes.
Night mode is useful for city streets, rooms, lamps, signs, still objects, and quiet evening scenes. It is less reliable for moving pets, children, people walking, or anything fast. The photo can still blur if the subject moves during capture.
Before using flash, look for better light. Move near a window, lamp, doorway, sign, or brighter part of the room. Flash can help in some dark scenes, but it can also make skin look harsh and flatten the mood of the photo.
Build a simple shooting routine.
The easiest way to use the camera better is to follow the same short routine each time.
First, clean the lens if the photo looks hazy. Then choose the mode. Tap the subject. Adjust brightness. Check the edges. Hold steady and take the shot.
That routine works for most photos and videos. Once it feels natural, add extra tools only when they solve a real problem. Use Pano for width, Portrait for blur, AE/AF Lock for shifting focus, and Night mode for still low-light scenes.
Learning how to use your camera features does not mean using every feature at once. It means knowing which control helps the photo in front of you
Conclusion
Learning how to use iPhone camera controls gets easier once you focus on a few habits: tap to focus, adjust brightness, choose the right mode, and avoid pushing zoom too far.
The camera app works well on its own, but a few small choices make it easier to trust. Tap to focus, adjust brightness, pick the mode that fits the scene, and avoid pushing zoom too far.
Once you know how to use iPhone camera controls, settings like grid, Preserve Settings, Live Photos, and Photographic Styles can make the app feel more personal without making it harder to use..
About Author
Bob Wild is a photographer, the creator of Phone Photo Guide, and the founder of Who Said Photography. He shares practical mobile photography tips based on real shooting situations, including portraits, natural light, composition, and everyday phone editing.