
How to Make an iPhone Photo Brighter Without Overexposing

Bob Wild
Fine Art Photographer, Vancouver Island
Founder of Who Said Photography | 20+ years shooting | I try and test every tip on real shoots before it goes on the page

When I want to make iPhone photos brighter, I don’t simply increase the exposure and hope for the best. I’ve taken plenty of photos where a person’s face, a pet, or an entire room looked too dark because my iPhone was exposed to a bright window or sky instead of my subject. I’ve learned to first decide what needs to be brighter, then make small adjustments while watching the highlights. Push things too far, and bright clouds, lamps, or pale skin can quickly lose important detail.
Key Takeaways
Tap the subject first so exposure responds to the part that matters most.
Raise exposure gently to brighten faces without washing out bright skies.
Lock exposure when framing changes so brightness stays consistent between shots.
Edit shadows before exposure when only the dark areas need more detail.
Compare every adjustment with the original to avoid flat, unnatural results.
Why does your iPhone photo look dark?
Your iPhone photo may appear dark because the camera is auto-adjusting to protect a bright area in the scene. If a window, lamp, or pale sky fills the majority of the frame, automatic exposure may darken everything to keep that bright area from turning white.
A properly exposed sky doesn’t help if the person’s face is too dark to see. Decide whether the subject or the background deserves priority before touching the controls.
Modern iPhones use computational processing to balance bright and dark areas. High dynamic range processing can merge information from multiple exposures into a single photo, helping preserve detail across the scene. The finished HDR photo may also appear brighter when viewing it on a compatible display.
How should you brighten the shot?
Brighten the shot by tapping the main subject, then dragging the sun control upward in small steps. Stop when the subject is clear and the brightest areas still show texture and colour.
Tapping does two jobs: it places focus on the subject and tells the camera which area it should set the exposure for. If you adjust first and reframe later, the automatic system may change brightness again.
Use this quick method:
- Open the camera in photo mode and frame the scene.
- Tap the face or object that must look sharp and bright.
- Drag the sun icon upward a little.
- Examine the sky, windows, lamps, and pale surfaces for lost detail.
- Take a test photo and inspect it, not just the live preview.
When the background is brighter, move the subject toward softer light. Turning a face toward a window can improve the balance without a large exposure increase.
The same approach works when you photograph a person, pet, product, or selfie. Before you take the photo, check the brightest area as well as the subject instead of judging exposure from the subject alone.

When should you lock the exposure?
Lock exposure when the subject and light stay similar but your framing changes. Touch and hold the focus area until AE/AF Lock appears, then adjust the sun control and take the series.
Recomposing can bring a bright or dark area into the frame and trigger the automatic settings. A lock keeps focus and exposure steady, which is useful for several portraits, products, or scenes with moving backgrounds.
AE/AF Lock holds focus and exposure until you tap elsewhere. The separate exposure control can hold an adjustment until the camera is reopened. Preserve it between sessions through Settings > Camera > Preserve Settings > Exposure Adjustment.
Supported models may also offer exposure through camera control. Menus vary by model and mode, so the on-screen sun control is the clearest general method.
Features also vary between iPhones. An iPhone 11 or iPhone 13 won’t offer exactly the same camera controls as an iPhone 14 Pro, iPhone 15 Pro, or newer Pro Max model. Check the controls available in your version of iOS rather than assuming every model behaves the same way.
Don’t include everything just because it’s there. A simple photo with one clear subject usually works better.
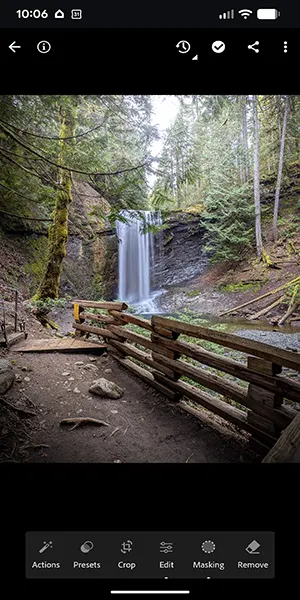
Edit brightness carefully in the Photos app.
After you take a photo, open the image in your preferred photo editing camera app. Use the Enhance feature for a quick suggestion, or choose a specific control for more precise adjustments.
If you’re viewing several images, choose the photo taken with the best expression, focus, and highlight detail before spending time editing. Starting with the strongest frame usually gives you more room to brighten the image without pushing the controls too far.
These controls solve different problems:
|
Control |
Best use |
Watch for |
|---|---|---|
|
Exposure |
Brighten the entire photo |
White skies and washed-out skin |
|
Brilliance |
Lift detail with a balanced change |
Flat contrast when pushed too far |
|
Highlights |
Recover or control bright areas |
Dull light if reduced too much |
|
Shadows |
Reveal detail in darker areas |
Noise and weak colour in deep shadows |
To make an iPhone photo brighter without flattening it, raise exposure only until the image feels close. Lower Highlights if bright areas look harsh, or raise Shadows if the subject alone needs help.
If you don’t like the result, tap Revert to return to the original. You don’t need another app for these basic adjustments, although apps like Lightroom offer more detailed editing controls when you need them.
Protect highlights while lifting darker areas.
A brighter image isn’t better if the important light areas become almost white. Watch clouds, white clothing, her wedding dress, window views, and skin highlights as you edit. If their texture disappears, reduce exposure and use shadows or brilliance instead.
Shadows and dark areas have limits. Raising deep shadows can reveal grain, muted colour, or blocky detail because the original file captured little clean information there. At the pixel level, editing can’t recreate clean detail that wasn’t recorded in the first place.
A bright window may be acceptable in a portrait, while a landscape often needs detail in the ground and sky. There isn’t one correct slider value.
HDR mode and related processing can help with scenes that contain both deep shadows and strong highlights. On newer models, high dynamic range processing happens automatically rather than through a separate HDR mode you enable or disable for every shot. Full HDR viewing also depends on the photo, device, display, and settings being used.
Use photographic styles with restraint.
Photographic styles changing tone, colour, and intensity can help establish a stylistic look, but they shouldn’t be the first fix for a subject that is simply too dark.
Return to standard while diagnosing exposure. A dark tone can make exposure look dim, while a bright style can hide weak highlights. Fix exposure first, then choose a look.
Style controls differ by model. Editing the latest-generation styles later requires a supported iPhone and high-efficiency capture. Follow the controls shown on your phone.
A filter can also change how bright a photo appears without fixing the underlying exposure. If a filter makes the shadows too heavy or highlights too pale, reduce its strength or remove it before making exposure adjustments.
Build a simple bright-photo routine.
Use the same short routine whenever the preview looks too dark:
- Clean the lens and look for a bright source affecting the scene.
- Tap the subject, then raise the sun control slowly.
- Move the subject or change your angle when the light is badly unbalanced.
- Lock exposure when you need several consistent frames.
- Shoot a test photo before the moment passes.
For an existing image, begin with Exposure or Brilliance, protect Highlights, and lift Shadows only as much as needed. Step away briefly, then compare with the original. Post-processing edits can be reverted.
Solve the light during capture when you can, then use editing for a controlled finish.
Keep Learning
Your next move with the camera
You’ve got the controls. These are the guides I’d hand you next. Each one picks up where the other left off. Written from the same real photo shoots
-
How to Use Android Camera Controls for Better Photos
How to Use Android Camera Controls for Better Photos I’ve found that most beginners don’t need more camera…
-
How to Use iPhone Burst Mode for Moving Subjects
How to Use iPhone Burst Mode for Moving Subjects A moving subject can change position between the moment…
-
How to Use iPhone Camera: Plain Guide to Camera Controls
How to Use iPhone Camera: Plain Guide to Camera Controls Learning how to use iPhone camera controls starts…




RECOMMENDED EDITOR
On1 Photo RAW – For when you outgrow the build in phone editor
The mobile editor I reach for my serious shots. Free 30-day trial
Conclusion: Keep brightness changes small and useful.
The safest way to make an iPhone photo brighter is to expose for the subject and watch the highlights. Tap what matters, raise brightness in small steps, and lock the setting when the framing changes.
If the photo is already taken, use the Photos controls with the same restraint. A balanced image with believable colour and some natural shadow will usually look stronger than a flat, over-bright edit.
About Bob Wild
Bob is a fine-art photographer on Vancouver Island and the creator of Phone Photo Guide, and the founder of Who Said Photography. He shares practical mobile photography tips based on real shooting situations, including portraits, natural light, composition, and everyday phone editing.