
Rule of Thirds on iPhone: Compose Better Photos With Ease

Bob Wild
Fine Art Photographer, Vancouver Island
Founder of Who Said Photography | 20+ years shooting | I try and test every tip on real shoots before it goes on the page

I’ll turn on the grid lines and use the rule of thirds on iPhone when the composition of the photo feels awkward, even though the exposure and focus look right. I’ve discovered that positioning the subject off-centre can enhance the scene’s balance and optimize the use of the surrounding space.
This rule gives me a simple starting point for deciding where to place the subject, how much room to leave around it, and where the horizon should sit. I don’t use it for every photo, but it’s a useful guide when I’m not sure which composition works best.
Key Takeaways
Turn on the grid so thirds become visible while you frame.
Place key details near intersections to provide viewers a clear starting point.
Set horizons high or low to favour the strongest parts of the image.
Leave space ahead of moving subjects so the frame feels natural.
Break the rule of symmetry when centred framing supports the scene.
What is the rule of thirds?
The rule of thirds is a composition guide that divides the frame into nine sections. You can also consider these as nine equal parts. Two horizontal and two vertical lines create four intersections where you place your subject.
Horizontal and vertical lines help you place elements within the frame. The grid’s horizontal line can guide your horizon placement, while a vertical line helps position a person or another subject.
Why this matters: a camera doesn’t know which part of the scene is telling your story. The grid provides a quick visual way for you to position the subject away from the centre of the frame and allows you to use the surrounding space more purposefully.
The intersections aren’t exact targets. Place the focal point near one, then judge how it relates to the rest of the scene.
How to use rule of thirds on iPhone?
Turn on Apple’s Grid control, then use its lines as references while framing. Go to Settings, tap Camera, and enable Grid. Apple also offers a separate level control for checking camera alignment.
Once enabled, the camera grid will appear as an overlay in the Camera app, giving you a visual reference while you compose the shot. Don’t worry, it won’t be seen in the final capture.
Why do we care? The grid shows the three-by-three structure before you take the photo. You can make a deliberate composition during capture and keep more image area than you might have after a heavy crop.
The setup is confirmed in Apple’s iPhone User Guide.
Applying the rule of thirds on an iPhone, identify the one detail that should attract attention first. Move the phone or adjust your angle until that detail sits near a line or intersection. Then scan your background and edges before pressing the shutter.

Where should you place the subject?
Place the subject near an intersection when the extra space beside it adds context, direction, or balance.
Subject placement affects where the viewer looks and how the scene feels. Some space around the subject can show a location, suggests movement, or separates a person from a distracting background.
If someone looks to the side, leave more room in front of their face than behind their head. If a pet, cyclist, or car moves across the frame, leave space in the direction of travel. The subject will feel less confined.
Choose a horizon that supports the scene.
Place the horizon near the lower third when the sky is the strongest part of the photo. Use the upper third when the foreground contains better colour, texture, reflections, or leading lines.
Align the horizon with one of the horizontal lines. Choose the lower line when you want to emphasize the sky, or the top horizontal lines when the land or foreground deserves more attention.
Avoid placing the horizon through a person’s head simply to match a line. Choose the subject first, then fit the horizon around it. Turn on Level when you also need to check whether the camera is straight.
A centred horizon can suit a clean reflection. In a plain landscape, it may give equal space to two unequal parts.
Give portraits and movement enough space
For a loose portrait, place the nearer eye around an upper intersection and assess the space beside the face. The person doesn’t need to touch the grid line exactly.
Space helps when a subject faces sideways. Movement space does the same job for a runner, pet, bicycle, or vehicle. In both cases, the open area gives the viewer a natural direction to follow.
Watch the outer thirds for distractions and awkward crops. Move if a pole or bright edge pulls attention from the face.
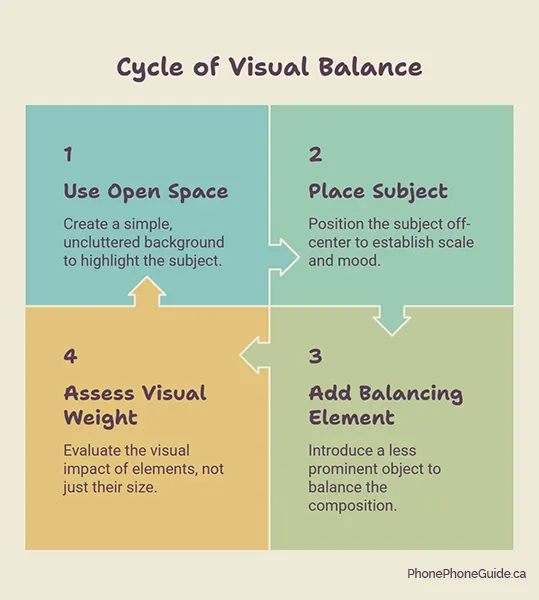
Balance the subject with open space.
Open space can make a small subject easier to notice, especially when the area is simple in colour and texture. Place the subject on one side and let the quieter area establish scale or mood.
A second object can balance the opposite side. Keep it less prominent so it doesn’t become a rival.
When assessing balance, consider the visual weight of elements rather than just the amount of space. A bright sign may outweigh a large dark wall.
|
Scene |
Starting Placement |
Check Before Shooting |
|---|---|---|
|
Portrait |
Eye near an upper intersection |
Leave room in the direction of the gaze |
|
Landscape |
Horizon on the upper or lower line |
Give more space to the stronger half |
|
Moving subject |
Subject on the trailing third |
Leave clear space in front of the movement |
|
Small detail |
Detail near one intersection |
Keep the surrounding area simple |
|
Reflection |
Centre or horizontal third |
Choose symmetry or unequal halves on purpose |
When dead centre framing works best
Use centred framing when symmetry, repetition, or a direct connection is the main idea. Reflections, doorways, corridors, isolated subjects, and straight-on portraits are useful examples.
Centred doesn’t mean careless. Compare both sides and check whether repeated shapes line up.
If you’re uncertain, consider taking both versions. An off-centre photo may feel more open, while the centred photo may feel calmer or more direct.
Practice with three deliberate frames.
Choose a still subject and take three photos without changing the light, distance, or zoom. Put the subject in the centre, on the left third, and on the right third.
Compare the images full screen. Notice where your eye goes first and whether the space helps. Repeat with a high, low, and centred horizon.
This exercise turns the rule of thirds on the iPhone into a choice you can see, not a rule you have to memorize. With practice, you’ll frame more quickly and recognize when a different arrangement fits the scene.
Keep Learning
Your next move with the camera
You’ve got the controls. These are the guides I’d hand you next. Each one picks up where the other left off. Written from the same real photo shoots
-
How to Take Better Photos With Your Phone
How to Take Better Photos With Your Phone How to take better photos with your phone starts with…
-
How to Use Android Camera Controls for Better Photos
How to Use Android Camera Controls for Better Photos I’ve found that most beginners don’t need more camera…
-
How to Use iPhone Burst Mode for Moving Subjects
How to Use iPhone Burst Mode for Moving Subjects A moving subject can change position between the moment…




RECOMMENDED EDITOR
On1 Photo RAW – For when you outgrow the build in phone editor
The mobile editor I reach for my serious shots. Free 30-day trial
Conclusion: Make every placement serve the photo.
Use the rule of thirds to solve a specific problem: place the subject, choose the stronger half, or create useful space. Don’t force every important detail onto a line.
Start with the grid, check the edges, and take a centred alternative when the scene supports it. The strongest composition is one that clearly conveys the intent of your subject.
You’ll also find other third-party camera apps that teach you about composition rules, but you don’t need one just to use the thirds. The built-in grid works just fine.
About Bob Wild
Bob is a fine-art photographer on Vancouver Island and the creator of Phone Photo Guide, and the founder of Who Said Photography. He shares practical mobile photography tips based on real shooting situations, including portraits, natural light, composition, and everyday phone editing.